Okay, so this is a bit different for me, though it does show that I am creative in more ways than one.
As I’ve booked a table at the Indie Zone in The Alley for Supanova Melbourne (April 15–17), I thought I’d need some business cards to hand out. My dilemma was finding something nice to display them in. I searched the Net for a number of hours, looking for an inexpensive and unique business card holder, and couldn’t find what I was looking for. So I thought to myself that maybe I could make one, and searched for ideas. Bingo! Lisa Minckler, at You Made Me Ink! used an earring box to make a unique business card holder back in 2012. Having looked at some of Lisa’s other projects, I can only say that she is a very talented and creative artist. She provided me with the inspiration I needed!
I knew I wasn’t in Lisa’s league, but I was going to give it a go.
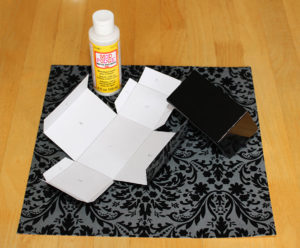
I didn’t have any earring boxes, and the usual shops I would trawl for this sort of thing didn’t have any either. I settled for a couple of small gift boxes from The Reject Shop instead. I wasn’t fussed what they looked like on the outside, as they were going to be covered up anyway, but for my project, finding a couple of boxes with a black interior was a bonus.
I found some lovely flocked paper at Kaisercraft — After Five Collection, Debutante — bought some Mod Podge matte glue, a packet of wooden cotton spools in various sizes, and Steam Punk jewellery featuring a cherub and angel wings from Spotlight.
With the basics for my business card holder purchased, it was off home to start work on the project.
1. Create a template using plain paper.
I can’t stress this enough. Don’t waste your more expensive paper on creating a template. If you’re like me, and make a mistake, you’re likely to curse yourself for having wasted the good paper.
On my first attempt, I glued the sides after having glued the front and back. The result was that the flaps from my sides showed up on the front and back of the box. The front and back should look like one solid piece. That means gluing the sides to the box before the front and back. To make sure I didn’t make the same mistake again, I numbered each part of the template, based on the order in which they should be glued.
Wasted good paper count = 1
2. Use your template to cut out your good paper.
Use a pencil to trace the outline of your template onto the reverse of the paper you’re going to use to cover the box. You don’t necessarily have to do this on the reverse side of the paper, but with dark paper it makes it easier to see the lines. Draw the fold lines as well.
Don’t forget to check that the design on your paper is facing the right way before you start cutting it out. After I’d cut out my second one I realised that the pattern was on the side. Grrr! By using a pencil to trace your template, you can easily erase the lines and start again. Also, if you’re making a matching set of business card holders, make sure your template is positioned in the exact same spot on each sheet of paper. That way your design will look consistent throughout.
After you’ve carefully cut out your good paper, make a diagonal cut between what will be the bottom of the flaps for the sides, and the base of the box. (I hope that makes sense!) Now make your folds along the fold lines. This ensures it’s easier to mould the paper around your box.
Wasted good paper count = 2
TIP: Run a black permanent marker around the edges of your paper. This will hide any ‘white’ edges that might show up once you’ve glued the paper in place. If you’re using a different colour paper, choose a marker of a similar colour to go over your edges with. Of course, if you’re using white, or a really light colour, there’s no need to go around the edges at all.
3. Start gluing.
I found it was easier to use my finger to spread the glue on the paper. The Mod Podge glue I used is non-toxic, so I was happy enough to get a sticky finger. If you choose to do the same as me, keep a wet wipe or serviette close to hand, so you can wipe the excess glue off your finger.
Glue the base first. Lift up the sides, front and back, to make sure your box is positioned in the right place. Let go, then press down on the inside base of the box for a few seconds to make sure the paper and box bond. I waited 5–10 minutes before proceeding to glue the sides.
Once you’re ready to move on, glue one side at a time, including the side flaps. Don’t glue the top flaps yet. We’ll do that once the front and back have been glued onto the box.
Did you wait 5–10 minutes? It probably won’t make much difference if you haven’t. I just used that time to hang out the washing, check my emails and get something to drink. Many cups of tea and coffee were consumed during the making of this business card holder. I refrained from alcohol. Who knows what it might have turned out like if I’d had a tipple or two … or three!
Okay, back to work. Glue down your front, have a drink, then glue the back. It’s starting to look good, isn’t it?
Fold the top flaps over and into the box one at a time. If one or more of them seems a bit squished inside the box, trim the sides slightly. Now glue those suckers down!
4. Add your embellishments.
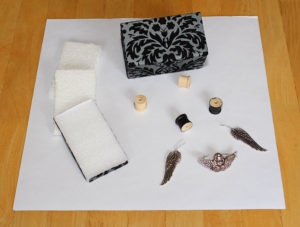
I didn’t have any black paint, so I used a black permanent marker to colour the little wooden spools I used as feet. More gluing! Turn your box upside down and add your feet. I allowed 20 minutes for them to dry before adding my other embellishments, though you could easily change the order in which the embellishments are added, to speed things up.
The front of the box is 10cm wide, so I wanted the middle of my cherub to be at the 5cm mark. I figured I’d allow 1cm (or thereabouts) from the top of the box for the placement of the cherub’s wings.
When I had my placement set, I sat the cherub in position and used a white gel pen to mark the places where I needed a hole. I dialled the smallest setting on my mum’s old dial-a-hole punch to make the holes. I used the same twist ties that held the cherub and angel wings to the cardboard they came on to attach the cherub to the box. Don’t forget to flatten the wire for the twist ties against the inside of the box.
I measured the side of the box (6cm), halved it and made a mark 1cm from the top on each side of the box. This is where I made the holes for the angel wings, once again attached by the twist ties. The wings were a bit of a challenge, as they wouldn’t stay upright. After a bit of fiddling around, I figured out that if I twisted the twist tie firmly around the wing first, then popped it through the hole and flattened it against the inside of the box, it stayed where I wanted it to.
Lastly I added some tape over the flattened out pieces of the twist ties on the inside of the box.
5. Pad the inside of your box.
The boxes I chose to use are quite deep for business cards. I could have stored some business cards in the bottom, but once I started using the stored cards, I’d still have the problem of them not being really visible in the holder. I found some old packaging foam (they’re shown in the image for the previous step), cut it to shape and used it to pad the bottom of the box. I then glued some of the good paper from the off-cuts onto the top layer.
6. Make a backrest.
Okay, nearly done. I looked at the box and thought that if there were only a few business cards left, they might not sit upright. Solution — a backrest.
You really should make a template on plain paper for this as well, as you’ll want it to look quite neat. Follow the same principles as outlined in steps 1–3 and you should be right.
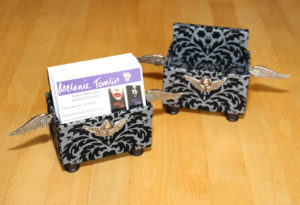
I used more packaging foam to make the backrests. They sit nicely in the box, and when it’s empty, it looks like a funky little couch! Kind of cute, don’t you think?
You don’t have to use the same paper, embellishments or even box shape/size as me. Whatever you do, make it personal. For me, it was about my Angel Series, so I wanted something to reflect that. I may well make another unique business card holder for the other series I have planned (3P Trilogy). It’s certainly cheap enough that you can have a dozen or so ‘originals’ already made up, to suit a different mood or purpose.
15
I’m so honored and your business card holder turned out STUNNING!! I’m sorry, your funky little couch looks AWESOME! LOL…you did an amazing job and best of luck to you at Supanova.